REVIEW · OSAKA PREFECTURE
Private Day Tour in Osaka and Kyoto with charter car
Book on Viator →Operated by HALLO CAR · Bookable on Viator
Ten hours, two cities, one smooth ride.
This private Osaka and Kyoto charter is built for people who want iconic sights without the stress of trains and transfers. I like that you get multiple route options built around big hitters like Kiyomizu-dera and Fushimi Inari Shrine, and you also get the comfort of door-to-door pickup with easy driver contact. One possible drawback: extra costs can pop up on the day for parking and, if you want to end in Kyoto instead of Osaka, a backway fee.
The big value here is control. Instead of squeezing everything into public-transport time tables, you set the rhythm with a private driver and stay focused on what you came for. The tour is listed at about 8 to 10 hours, and most main stops are given around 1 hour each—so you’ll see a lot, but you’ll also want a good pace mindset.
Communication is part of the experience. Your team sends a friend request on WhatsApp/LINE/Wechat about 2 days before departure and sets up a group chat with the driver, so you’re not scrambling when you’re trying to find your pickup point. Just remember: lunch is on you, and some costs are not included.
In This Review
- Key Highlights Worth Your Time
- Charter Car Value: You’re Paying for Time and Calm
- Route Choices: Pick the Day You Want, Not the One You’re Stuck With
- Osaka Start and the Easy Pickup Plan
- Kyoto’s Big Moments: Kiyomizu-dera First-Class Temple Time
- Nishiki Market: Where Your Kyoto Day Turns Practical
- Gion: You Get the Atmosphere, Not a Wandering Mess
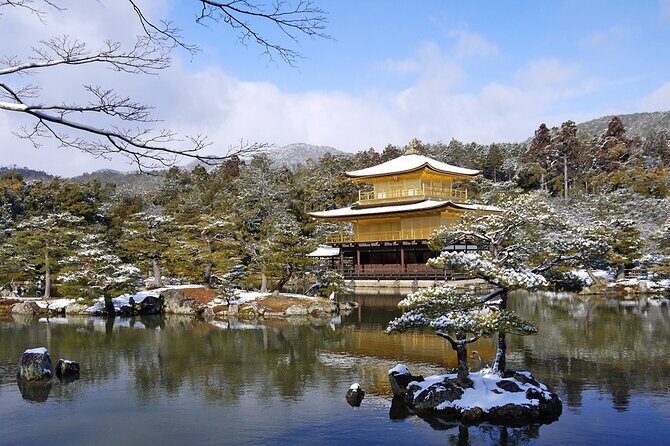
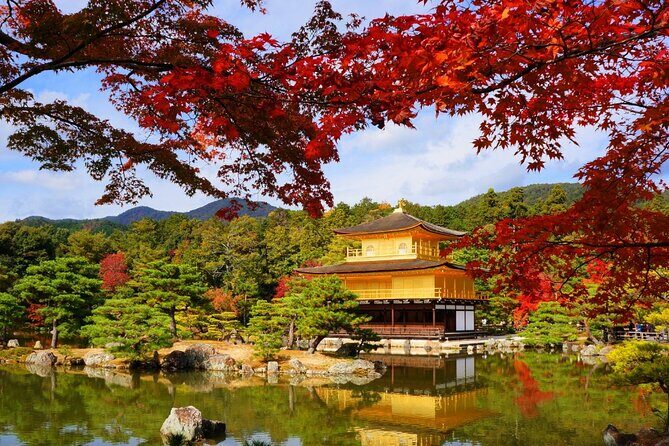
- Kinkaku-ji and Fushimi Inari: The Photo Hits That Still Matter
- Kinkaku-ji (Golden Pavilion)
- Fushimi Inari Shrine
- Golden Pavilion Isn’t the Only Temple Play: Ginkaku-ji and Nijo Castle Options
- Ginkaku-ji (Silver Pavilion)
- Nijo Castle
- Arashiyama and Hanamikoji: When You Want Kyoto Neighborhood Energy
- Arashiyama
- Hanamikoji Street
- Optional Kobe Route D: A Different Flavor With City-to-Regional Jumping
- Price Reality Check: What $539.76 Covers and What You’ll Still Pay
- Who This Private Charter Fits Best
- Should You Book This Kyoto and Osaka Private Day Tour?
- FAQ
- What’s the price for this private Osaka and Kyoto charter car tour?
- How long is the tour?
- What routes are available?
- How does pickup and contact with the driver work?
- Are admission tickets included for the main stops?
- What extra costs should I budget for?
- Is cancellation free?
Key Highlights Worth Your Time
- Route choices that change the whole day (Arashiyama/Gion, or the Golden Pavilion + Fushimi Inari focus, plus an optional Kobe route)
- Door-to-door pickup with pre-trip chat using WhatsApp/LINE/Wechat so you can locate your car fast
- Classic Kyoto stops built into a logical loop so you’re not zig-zagging across town all day
- Each major stop is about 1 hour, which is ideal for photos and browsing without turning it into a marathon
- A private group of up to 5 means you can travel together and keep decisions simple
Charter Car Value: You’re Paying for Time and Calm

At $539.76 per group (up to 5) for roughly 8–10 hours, you’re not buying cheap. You’re buying less friction. The math gets better when you travel with friends or family, because you’re splitting a single vehicle instead of paying for multiple tickets and transfers.
What makes this feel worth it is how the day is structured: you move between major sites, then get focused time at each stop. That matters in Kyoto and Osaka, where traffic, lines, and station navigation can chew up your energy. With a private car, you can spend that time actually looking up at temple roofs and reading street-level details instead of checking maps every ten minutes.
Costs to keep in mind: the fuel surcharge and an express fee (about 10,000–12,000 yen) are included, but parking is around 1,000 yen and isn’t. If you want a different end point, you may also pay an extra 2,500 yen backway fee if drop-off is in Kyoto rather than Osaka. Those are the kinds of add-ons that usually decide whether a “good deal” stays a good deal.
You can also read our reviews of more private tours in Osaka Prefecture

Route Choices: Pick the Day You Want, Not the One You’re Stuck With
The tour offers several route patterns, and each one creates a different mood.
Route A is a strong “greatest hits” loop: Kinkaku-ji (Golden Pavilion) → Kiyomizu-dera → Nishiki Market → Fushimi Inari Shrine → Gion. If you want Kyoto highlights plus a classic food-and-shopping street, this is a sensible blend.
Route B makes Arashiyama a centerpiece: Arashiyama → Kinkaku-ji → Kiyomizu-dera → Hanamikoji Street. This route leans more into old-kyoto atmosphere and the geisha district vibe, with fewer time slices dedicated to shopping.
Route C aims for temples plus castles: Gion Shirakawa → Keage → Ginkaku-ji (Silver Pavilion) → Kiyomizu-dera → Nijo Castle. If Golden Pavilion photos are tempting but you also want a calmer, craft-like side of Kyoto, this one feels balanced.
And Route D is the wildcard: it connects Kobe (including Kobe Port/Kobe Rinkai Paradise, Nankin Town/Chinatown, an old residence, Ikuta Shrine, and Kitano Ijinkan) with a day that’s more regional than strictly Kyoto. It’s a good choice if you’re using your trip to look beyond Kyoto’s center.
One practical tip: since most stops are listed at around 1 hour, choose routes based on what you’d hate to miss. You can appreciate every stop, but you can’t do everything in one short visit.
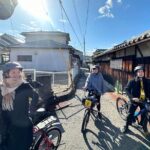
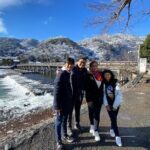
Osaka Start and the Easy Pickup Plan
Your day begins in Osaka, and pickup is offered. What I appreciate most is the contact method: your staff sends a friend request on WhatsApp/LINE/Wechat about 2 days before departure, then creates a group chat with the driver for day-of coordination.
That one detail can save real time. In Japan, “where exactly are you standing?” can turn into a 20-minute scavenger hunt. Here, you’re meant to get your bearings fast—with a direct channel to the driver.
The tour also notes you’ll have a mobile ticket, and that helps keep things straightforward once you’re meeting up.
Also, the tour’s default pattern is to start and end in Osaka. If you’re thinking about ending in Kyoto instead, that’s where the 2,500 yen backway fee comes in (payable on-site).
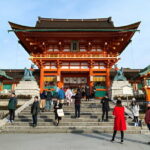
Kyoto’s Big Moments: Kiyomizu-dera First-Class Temple Time
Kiyomizu-dera is one of those places you understand even before you reach it. The tour gives you about 1 hour, and that’s enough time to slow down, look for viewpoints, and take in the temple area without feeling rushed.
A practical mindset helps here. In busy seasons, Kiyomizu-dera can get crowded, and the best experience often comes from choosing what you want most: a calm walk-through moment or a top viewpoint photo. Because you have only about an hour listed, don’t try to do everything at once.
What also helps is that Kiyomizu-dera sits in a natural connection to nearby Kyoto neighborhoods. So even if you keep moving on the schedule, you’ll still get that classic “Kyoto street energy” nearby rather than feeling like you arrived, posed, and left.
Nishiki Market: Where Your Kyoto Day Turns Practical
If your route includes it, Nishiki Market Shopping District is a smart stop. It’s narrow and runs for only a few blocks, lined with shops and restaurants, and it’s often described as Kyoto’s kitchen style of place.
The tour gives about 1 hour, which is ideal for tasting and browsing without turning it into a long shopping expedition. I like this timing because it’s a built-in break from temple walking. You can snack, grab something small, and keep your legs fresh for the next sight.
One caution: market crowds can rise fast. If you’re sensitive to crowds, treat your time there as browsing time first, buying time second.
And since lunch is at your own expense, Nishiki fits naturally into your day: eat light there, then handle a proper meal after the temple stops, or do the reverse.


Gion: You Get the Atmosphere, Not a Wandering Mess
Gion shows up on Route A, and Route B and C have related geisha-district areas like Hanamikoji Street and Gion Shirakawa. The tour lists about 1 hour for Gion, and I think that’s the right amount if your goal is atmosphere.
In this part of Kyoto, the details matter: street layout, tea-house lanes, and the sense that you’re walking through a maintained historical neighborhood rather than a theme park. With only an hour, you’ll want a plan: pick one main lane to explore slowly, then do a quick loop for photos.
Also, since your schedule includes major sites like Kinkaku-ji and Kiyomizu-dera, Gion works well as a decompression stop. It’s a softer shift from religious architecture and big landmark crowds into a calmer street vibe.
Kinkaku-ji and Fushimi Inari: The Photo Hits That Still Matter
If Route A includes both, Route B and C include Kinkaku-ji and/or other temple anchors. Let’s talk about the two most famous stops people come for.
Kinkaku-ji (Golden Pavilion)
Kinkaku-ji (Rokuonji) is a Zen temple known for its top floors covered in gold leaf. The tour lists about 1 hour, and that’s enough time to see the pavilion approach, notice the reflection views, and take photos without turning your day into a line-stand contest.
Because the location is visually dominant, you don’t need a long session to enjoy it. That’s exactly why it works on a day tour: it’s a “high payoff” stop where an hour gives you a complete snapshot of what makes it famous.
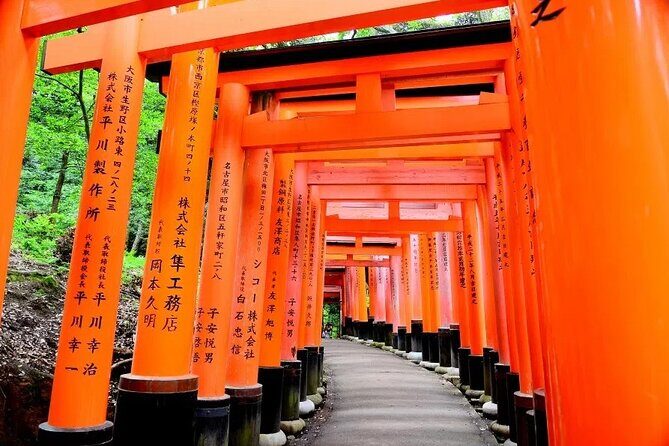
Fushimi Inari Shrine
Fushimi Inari Taisha is famous for its thousands of vermilion torii gates that form trails behind the main shrine area. The tour gives about 1 hour, which means you can enjoy the front area and still walk in some of the trails.
Here’s my practical advice: decide how far you want to go before you start climbing in and out of the gates. With time pressure, it’s easy to lose track of distance and come back feeling like you didn’t get the view you wanted. The shrine is vast, so pick a goal—then stop when you reach it.
Also note: the tour lists admission ticket free at these stops, which suggests you won’t be hit with major paid entry costs at the main sights. Still, always double-check on-site signage if you’re unsure.
Golden Pavilion Isn’t the Only Temple Play: Ginkaku-ji and Nijo Castle Options
Route C swaps in Ginkaku-ji (Silver Pavilion) and adds Nijo Castle, plus nearby stops like Gion Shirakawa and Keage.
Ginkaku-ji (Silver Pavilion)
Ginkaku-ji is part of the “other famous pavilion” club. It won’t feel like an identical experience to Kinkaku-ji; instead, it’s often appreciated for a quieter, more contemplative vibe. With the tour listing about 1 hour, you’ll likely get the main pavilion views and the key surrounding area.
If your group enjoys temple gardens and atmosphere more than flash photography, Route C can feel more satisfying.
Nijo Castle
Nijo Castle is a different kind of attraction—less about a single iconic building moment and more about exploring an official, historical structure. Having it on the schedule is a smart way to balance your day: you get both Kyoto’s spiritual landmarks and a palace-style site.
As with other stops, the 1-hour pacing means you’ll want to prioritize what you care about most inside the castle grounds. If castle interiors matter to you, aim to arrive with energy and move with intention.
Arashiyama and Hanamikoji: When You Want Kyoto Neighborhood Energy
Route B includes Arashiyama plus Hanamikoji Street. This is the route I’d choose if you want a little more variety in textures and street scenes, not only temple landmarks.
Arashiyama
Arashiyama is a Kyoto region people think of instantly, and it tends to deliver more “area exploring” than single-point sightseeing. With about 1 hour, you’ll get enough to feel the character without trying to see everything.
Practical expectation: in Arashiyama you often end up walking more than you think—so wear shoes you can move in comfortably.
Hanamikoji Street
Hanamikoji Street is the geisha district vibe in a more specific, street-focused form. If you liked the idea of Gion but want it less sprawling, this stop feels like a targeted version of that mood.
Because you only have a short window, I recommend treating it like a stroll: slow enough to notice the details, quick enough to still reach your next destination on time.
Optional Kobe Route D: A Different Flavor With City-to-Regional Jumping
Route D is a whole different day. It starts in the Kobe area and includes:
- Kobe Port / Kobe Rinkai Paradise
- Nankin Town (Chinatown)
- Kobe’s old residence
- Ikuta Shrine
- Kobe Kitano Ijinkan
If you’re visiting the Kyoto/Osaka duo but want to add variety, this route is your “don’t just do Kyoto again” option. Kobe can feel like a separate chapter—more regional and port-city energy, plus distinct neighborhoods.
This is also a good fit if your group likes mixing architecture styles and neighborhood walks, since Route D includes both shrine space and residence/foreign-style district elements (Kitano Ijinkan).
Price Reality Check: What $539.76 Covers and What You’ll Still Pay
Let’s be honest about value. At $539.76 per group up to 5, you’re paying for a private vehicle for 8–10 hours, plus included fuel surcharge and an express fee. That’s the backbone cost for charter-style transport.
Then there are the “small but real” add-ons:
- Parking fee around 1,000 yen (not included)
- Lunch is at your own expense
- If you need to start/end in Kyoto instead of Osaka, there’s a 2,500 yen backway fee on-site
- For children: the first child seat is free, but the second child starts at 2,000 yen each, and you’re asked to prepare cash for the driver
If your group is 4–5 people, the per-person value often feels more attractive. If you’re traveling solo or as a couple, it can still be worth it—especially if you hate logistics—but you’ll feel the cost more.
Who This Private Charter Fits Best
This is a great choice if you fall into one of these groups:
- You want major Kyoto sights (Kiyomizu-dera, Golden Pavilion, Fushimi Inari, and/or Gion) but you don’t want a train-and-walk puzzle
- You’re traveling with family or mixed mobility needs and want a driver to handle the in-between time
- You want to choose between different Kyoto styles (temples, geisha streets, Arashiyama area, or Nijo Castle structure)
- You’d rather spend your mental energy on the sights than on station navigation
It’s less ideal if you love freeform day wandering and don’t mind trains. The charter works best when you want a planned route and clean transitions.
Should You Book This Kyoto and Osaka Private Day Tour?
I’d book this if your priority is a low-stress day that still hits the big landmarks. The private car, the pre-arranged pickup communication, and the way routes are grouped around major sites are the reasons this works. If your group can split the vehicle cost, it’s even better.
I’d think twice if you’re trying to keep costs ultra-tight or if your plans include ending in Kyoto instead of Osaka, since that can add the backway fee. Also, if you’re the type who likes lingering for long periods, note that most stops are listed at about 1 hour, so you’ll need to enjoy a faster pace.
If you want a day where Kyoto and Osaka feel connected—without the transportation headache—this private charter is built for you.
FAQ
What’s the price for this private Osaka and Kyoto charter car tour?
It’s priced at $539.76 per group, with a capacity of up to 5 people.
How long is the tour?
The tour duration is listed at 8 to 10 hours (approximately).
What routes are available?
You can choose among multiple route patterns. Options include combinations featuring Kinkaku-ji, Kiyomizu-dera, Nishiki Market, Gion, Fushimi Inari Shrine, plus routes that include Arashiyama, Hanamikoji Street, Ginkaku-ji, Nijo Castle, and a separate Kobe-focused route.
How does pickup and contact with the driver work?
Pickup is offered, and your staff sends a friend request on WhatsApp/LINE/Wechat about 2 days before departure. They also create a group chat with the driver for easier contact on the day.
Are admission tickets included for the main stops?
The tour information lists Admission Ticket Free for the stops shown, meaning major admissions may not be required at those points. It’s still smart to confirm for anything you plan to add on your own.
What extra costs should I budget for?
Parking is listed at around 1,000 yen and isn’t included. Lunch is at your own expense. If you need drop-off in Kyoto instead of Osaka, there’s a 2,500 yen backway fee payable on-site.
Is cancellation free?
Yes. You can cancel for a full refund with free cancellation, as long as you cancel at least 24 hours in advance of the experience start time.