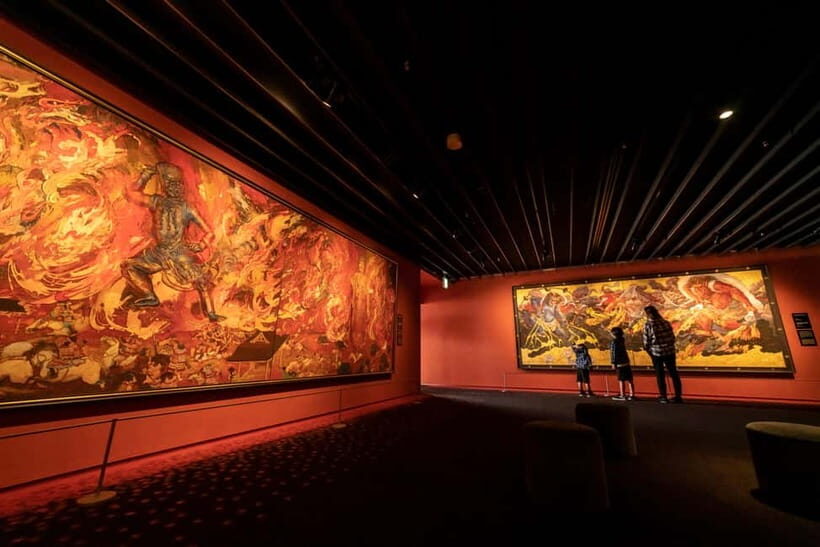
REVIEW · OSAKA
Hiroshima Private Guided Tour from Osaka or Kyoto
Book on Viator →Operated by Nara Guide · Bookable on Viator
Two islands, one day, a lot to process. This private route pairs Hiroshima peace landmarks with the calm of Miyajima and its famous Itsukushima Shrine torii. I especially liked the way the guide keeps you moving without turning away from the heavier parts, and I also liked the natural rhythm of ferry views, shopping street time, and shrine time. One possible drawback: the schedule is tight, and the Peace Memorial Museum visit is limited to about 2 hours, so serious museum lovers may want extra time.
You’ll start at Hiroshima Station at 8:00 am, meet your guide, then handle most of the day as a guided walk-through plus key rides and ferry time. In the best way, this tour mixes reflection and scenery: you’ll see Hiroshima’s Atomic Bomb Dome area, then later you’ll be staring out over the Seto Inland Sea on the way to Itsukushima. In my view, that contrast is the whole point of a day like this, as long as you pace your own emotions.
In This Review
- Key Highlights Worth Planning For
- A 9-hour Hiroshima and Miyajima day: how the flow actually works
- Atomic Bomb Dome and Peace Memorial Park: moving carefully through a painful place
- Hiroshima Peace Memorial Museum: what you get (and what you may wish you had more time for)
- Ferry to Miyajima: the short ride that makes the day feel lighter
- Miyajima Omotesando Shopping Street: lunch time and a quick taste of island life
- Itsukushima Shrine and the tide-dependent torii moment
- Omoto Park shika deer: the calm nature break you’ll remember
- Price breakdown and whether this day is good value
- What you’ll likely feel by the end of the day
- Who should book this private guided day (and who should skip it)
- Should you book this Hiroshima and Miyajima private guided tour?
- FAQ
- How long is the Hiroshima and Miyajima private guided tour?
- Where does the tour start and end?
- Is this a private tour?
- What’s included in the price?
- What are the main things not included?
- Do I need to pay for the Atomic Bomb Dome and Peace Memorial Park?
- Will I definitely be able to walk to the torii?
- Is the tour suitable for people with mobility concerns?
- Can I bring a service animal?
Key Highlights Worth Planning For
- Peace Memorial Park timing that lets you breathe between sites
- Atomic Bomb Dome-area viewing without rushing the meaning
- Ferry ride to Miyajima with big Seto Inland Sea views
- Itsukushima Shrine torii timing that changes with tide
- Omoto Park for close, calm shika deer encounters
- Private guide (including Japanese history context) with a focused day plan
A 9-hour Hiroshima and Miyajima day: how the flow actually works
This is a one-day private guided experience built around two places: Hiroshima’s peace sites and Miyajima Island’s famous shrine and scenery. The total time is about 9 hours, starting at 8:00 am at Hiroshima Station and ending back at the same place. The private format matters here because you’re not stuck in a big group shuffle at the moments that need your attention.
From Osaka or Kyoto, the day includes travel by Shinkansen and public transport as part of the overall plan. Just note that transportation costs in Hiroshima and public transportation are listed as not included, so you’ll want to budget for that rather than assuming everything in the base price automatically covers the full commute.
The tour is designed for moderate physical fitness. You’ll be walking through the Hiroshima Peace Memorial Park area and moving around Miyajima’s main sights, plus spending time on foot at the shrine grounds and toward the torii viewing area. If you’re used to walking around train stations and temples, you’ll likely be fine. If you’re recovering from an injury or you know you tire quickly standing still, plan on slower breaks.
One more practical detail I’d take seriously: this day includes tide-dependent sightseeing. That doesn’t mean the tour is chaotic, but it does mean you should accept that the torii experience may look different depending on when you reach it.
You can also read our reviews of more guided tours in Osaka

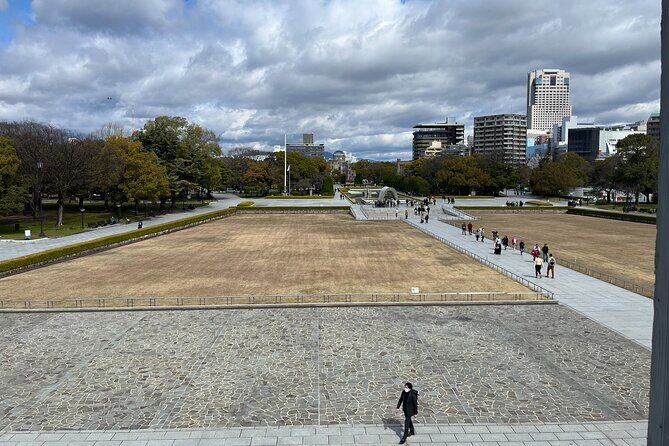
Atomic Bomb Dome and Peace Memorial Park: moving carefully through a painful place
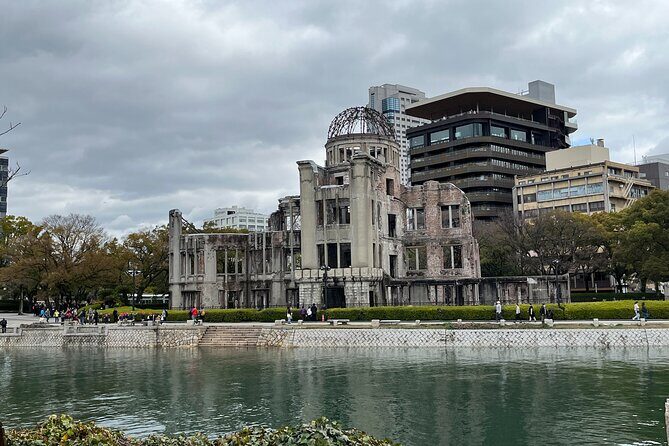
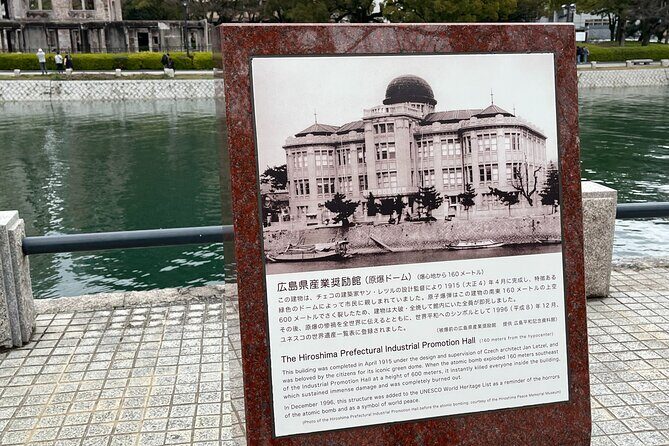
Hiroshima’s Atomic Bomb Dome area is where the day takes its first major emotional turn. The plan includes a stop at the Genbaku Dome (Atomic Bomb Dome). You’ll pass by the dome area and have about an hour for reflection. Tickets are free for this stop, which is good because it keeps the focus on the place, not paperwork.
Here’s what I like about the way this tour handles it: it doesn’t try to turn the dome into a quick photo stop. The dome is one of the world’s most recognizable wartime remnants, and it’s powerful even before you add any historical context. With a guide explaining the background, you’ll likely understand better why this particular building is still partially standing and why it matters in Hiroshima’s post-war memory.
Then you move into Hiroshima Peace Memorial Park. The route walks you between the Genbaku Dome and the Hiroshima Peace Memorial Museum. This “in-between” stretch is actually useful. Instead of going from one exhibit to another, you get walking time through the park itself. That gap is where your brain can catch up, especially if you’re coming from outside Japan and trying to process the story in the right order.
The Peace Memorial Park portion is also ticket-free and includes about an hour. If you like to pause and look closely, this timing helps. If you hate standing still, you might find yourself wanting just a bit more structure—still, having an organized walk in this setting usually keeps the day from feeling random.
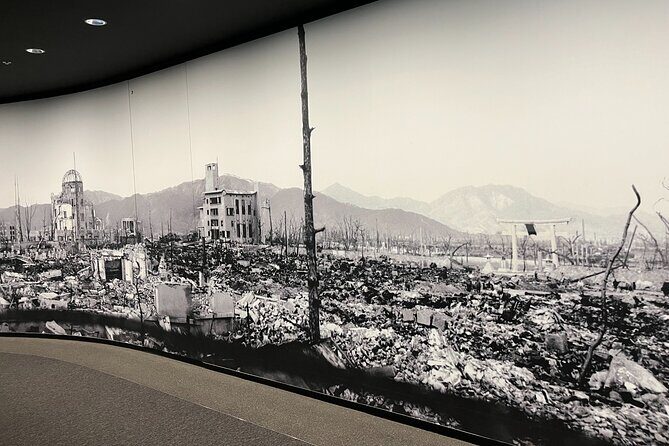
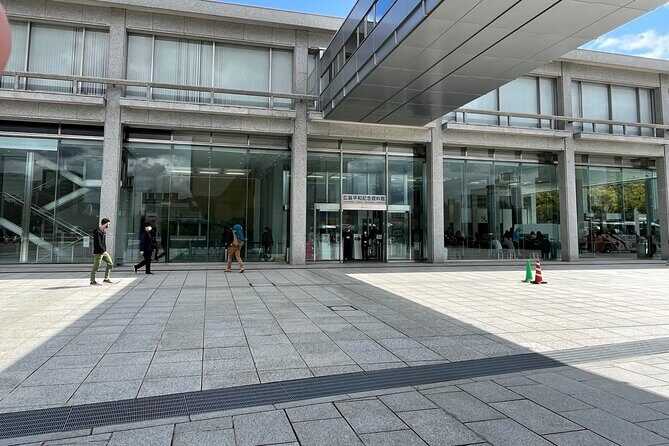
Hiroshima Peace Memorial Museum: what you get (and what you may wish you had more time for)
The Hiroshima Peace Memorial Museum is the most exhibit-heavy part of the Hiroshima side. You’ll spend about 2 hours there. Admission is not included, and the listed museum entry cost is ¥300 per person.
Two hours can be enough if you follow the story with your guide’s pacing and you focus on the main sections. But if you’re the kind of person who reads slowly, watches the footage carefully, and wants to examine photos and artifacts without rushing, you may feel the time limit. That’s not a flaw in the tour so much as the reality of a day that also includes Miyajima. You’re choosing a full-day itinerary, and the day has to make room for ferry time and shrine time.
What makes the museum visit valuable in a guided day is context. Without it, the exhibits can feel like a collection of heartbreaking images. With guidance, the museum helps you connect the dates, decisions, and consequences—so your emotions have an anchor. And even if you’ve visited museums elsewhere, this one works differently because it’s tied directly to Hiroshima’s exact experience.
My practical advice: go in with a plan. Look for a few themes you want to track (the lead-up to the event, immediate effects, and the post-war message of peace). If you try to read everything, you’ll likely finish the two hours exhausted.
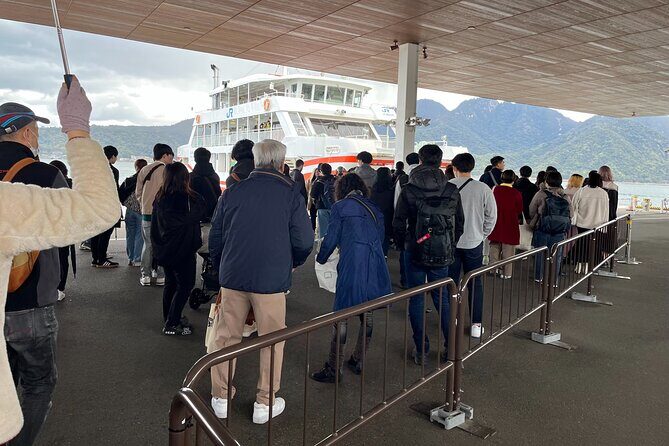
Ferry to Miyajima: the short ride that makes the day feel lighter
After Hiroshima, you shift gears with a ferry ride to Itsukushima (Miyajima) Island. The ferry segment is about an hour in the itinerary. Admission for this ferry is not included, so you should expect to pay for that portion separately during the day.
This is where the atmosphere of the day changes. On the Seto Inland Sea, the views help reset your senses. You’ll be moving away from dense city streets and toward open water and island nature. It’s not a distraction from the earlier sites—it can actually help you process them. You get a break from crowded indoor spaces, and you see Japan’s maritime landscape in motion.
Also, your timing matters here because Miyajima’s main sights follow a sequence. If you arrive too late, the torii tide opportunity might not line up as well. The itinerary is built to give you time for the shrine and torii viewing window, plus an extra nature stop afterward.
Miyajima Omotesando Shopping Street: lunch time and a quick taste of island life
Once you land on Miyajima, you’ll have a stop at Miyajima Omotesando Shopping Street for about an hour. Admission is free here, and it’s set up as your lunch window and strolling time.
This part of the day is not about deep history—it’s about being a human on vacation for a moment. You can browse snacks, local treats, and souvenirs without committing to a whole shopping marathon. If you want something easy for lunch, this is where you’ll likely find it.
One thing to keep in mind: lunch time on a popular island can get crowded. The plan gives you about an hour, so try not to treat it like a leisurely afternoon. If you want more time for food, eat closer to the start of your hour so you don’t lose time walking deeper into the street.
If you care about photos, this is also a handy window. You’ll have the energy to appreciate the island’s atmosphere, and you’ll be better ready for the shrine grounds afterward.
You can also read our reviews of more private tours in Osaka

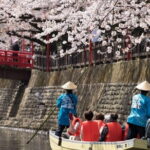
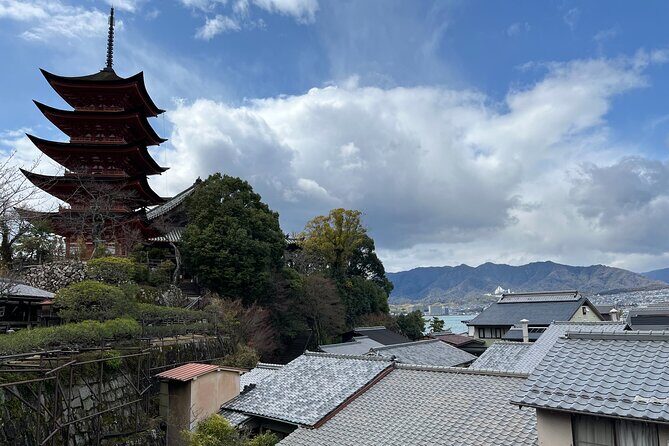
Itsukushima Shrine and the tide-dependent torii moment
The big star on Miyajima is Itsukushima Shrine, and you’ll spend about an hour there. Admission is not included, with the shrine entry listed at ¥300 per person.
You’re visiting one of Japan’s most famous religious sites, especially for its large torii positioned over the sea. Even if you’ve seen it in postcards, the real version has scale and atmosphere that photos don’t fully capture. There’s a reason the torii is the island’s signature. Standing near the water, it becomes obvious how the shrine design connects religion and landscape.
Here’s the key detail: you’ll also have a separate stop to see the Itsukushima Shrine torii itself, and your access depends on the tide. The itinerary explains that if the torii is low tide, you walk to it; if it’s high tide, you view it from the shore. That’s not just a technical note. It’s the difference between getting a close-up experience and getting a wider scenic view.
My advice is simple: don’t treat it as plan A only. If you can’t walk to the torii due to tide, the shore viewing can still be stunning because you’ll see the torii framed by water and horizon. The guided explanation helps here too—your understanding of why the shrine is built this way makes the whole moment more meaningful.
Omoto Park shika deer: the calm nature break you’ll remember
After the shrine, the tour heads to Omoto Park for about an hour. Admission is free, and this is your best chance to meet shika deer in a calm, natural setting. You’ll also get the chance to interact with them—at least within the way the tour plan supports.
This stop is a nice counterbalance to the earlier part of the day. Hiroshima asks you to sit with consequences. Miyajima, in contrast, gives you a slower rhythm: deer moving through green spaces, people quietly watching, and the island atmosphere doing what it does best—making time feel less rushed.
One practical consideration: deer are still animals. You’ll want to act respectfully and follow your guide’s instructions. In real life, that usually means no sudden movements, no crowding, and being patient if a deer doesn’t approach when you want it to.
Also, since you’ve been walking for much of the day, plan to use this hour to reset your body. Sit when you can, drink water, and enjoy the simple fact that the island has space to breathe.
Price breakdown and whether this day is good value
The listed price is $373.96 per person, and it’s often booked about 103 days in advance. That booking window suggests demand for private, guided Hiroshima plus Miyajima days—especially during peak seasons.
What you’re paying for matters. The included portion lists guide fees, including the guide’s transport, entrance, and lunch fees. But the major on-the-ground costs you’ll still need to handle are listed as not included:
- Peace Memorial Museum: ¥300 per person
- Itsukushima Shrine: ¥300 per person
- Transport in Hiroshima Prefecture: ¥3,500 per person
- Public transportation: ¥24,000 per person
Then there are the ferry and other ride costs tied to the Miyajima segment, which are also marked as not included in the plan.
So how do you judge value? This day packs two major destinations into one guided schedule. You’re not just buying transit and tickets—you’re buying someone to connect the dots between Hiroshima’s WWII memory and Japan’s post-war message of peace, and then to translate that context while you shift into Miyajima’s religious and natural environment.
If you’re comfortable navigating on your own, you could potentially stitch together trains and ferries cheaper. But the emotional weight of Hiroshima is exactly why a guide’s pacing helps. And the tide-dependent torii moment on Miyajima is another reason a guided day can feel smoother.
The best way to think about it: the base price is for a private, structured day. Your additional costs cover the paid entrances and parts of transport that are explicitly separated.
What you’ll likely feel by the end of the day
This is not a sightseeing-only itinerary. The Hiroshima segment asks for reflection, and the museum plus dome area do most of that work for you. Then Miyajima gives you serenity through scenery, shrine architecture, and shika deer. The overall experience can feel like two different chapters of the same human story: destruction and rebuilding, grief and peace.
If you’re the kind of traveler who likes to take a day trip and still feel changed afterward, this tour fits that type of mood. If you just want a light day of photos and snacks, you might find the Hiroshima portions emotionally heavy.
A small note on pacing: the museum time is limited, and the day is full. You won’t have hours for wandering. But the structure keeps things from feeling chaotic, and you’ll still get a complete arc.
Who should book this private guided day (and who should skip it)
Book this if you want a one-day plan that is organized, private, and emotionally guided. It’s a strong choice if you care about context in Hiroshima and you still want the iconic Miyajima experience without dealing with tide timing, ticket lines, and routing stress on your own. It also works well if you’re traveling with someone who prefers a clear schedule instead of constant navigation.
Consider a different style of trip if:
- You want a long, slow museum experience with lots of reading time
- You hate walking and standing for extended stretches
- You prefer to control every segment yourself without fixed stop durations
The private format also means it’s easier to ask questions and adjust on the fly, which is especially helpful when the topic is as serious as Hiroshima.
Should you book this Hiroshima and Miyajima private guided tour?
If you want a structured, guided day that combines Hiroshima peace sites with Miyajima’s torii, ferry views, and shika deer, I’d say it’s worth booking. The emotional pacing is the main draw, and the Miyajima side keeps the day from feeling one-note.
My advice is to decide based on your museum tolerance and your walking comfort. If the idea of a 2-hour museum stop feels fine and you’re okay with a packed but organized schedule, this private tour is a great way to do both places in one day—without losing the meaning in Hiroshima or missing the tide-dependent torii moment on Miyajima.
If you’re unsure, here’s the quick rule: choose it for guidance and flow; choose self-guided only if you’re confident with independent planning and you don’t need help interpreting what you’re seeing.
FAQ
How long is the Hiroshima and Miyajima private guided tour?
The tour runs about 9 hours.
Where does the tour start and end?
It starts and ends at Hiroshima Station, at 1-2-37 Matsubarachō, Minami Ward, Hiroshima. The meeting time is 8:00 am.
Is this a private tour?
Yes. It’s a private tour/activity, and only your group participates.
What’s included in the price?
The included part lists guide fees, including the guide’s transport, entrance, and lunch fees. The Peace Memorial Museum, Itsukushima Shrine, and some transport costs are listed separately as not included.
What are the main things not included?
Not included are the Peace Memorial Museum fee (¥300 per person), Itsukushima Shrine fee (¥300 per person), transport in Hiroshima Prefecture (¥3,500 per person), and public transportation (¥24,000 per person). The ferry also shows admission not included in the schedule.
Do I need to pay for the Atomic Bomb Dome and Peace Memorial Park?
No. Those stops list admission tickets as free.
Will I definitely be able to walk to the torii?
Not always. The plan says you walk to the torii if it’s low tide; if it’s high tide, you view it from the shore.
Is the tour suitable for people with mobility concerns?
The tour notes travelers should have a moderate physical fitness level. It also mentions it’s near public transportation. It’s best if you’re comfortable walking during multiple stops.
Can I bring a service animal?
Yes, service animals are allowed.